RV Air Conditioners Made Simple
By
Gary Motley
Master Certified RV Technician
February 2004
Air conditioner problems and questions are very common to most RVers. At
our shop we are often asked to repair an air conditioner unit (referred to as
unit(s) for simplicity) that an RVer feels is not working properly. Most often
with a little work these supposed defective units can be made to work much more
efficiently. This article is intended to inform the average RVer of some
cautionary maintenance steps and to answer some common questions.
Because there are different installations and models of units I intend for this first section to be generic to any unit(s) and then I will go into the individual types.
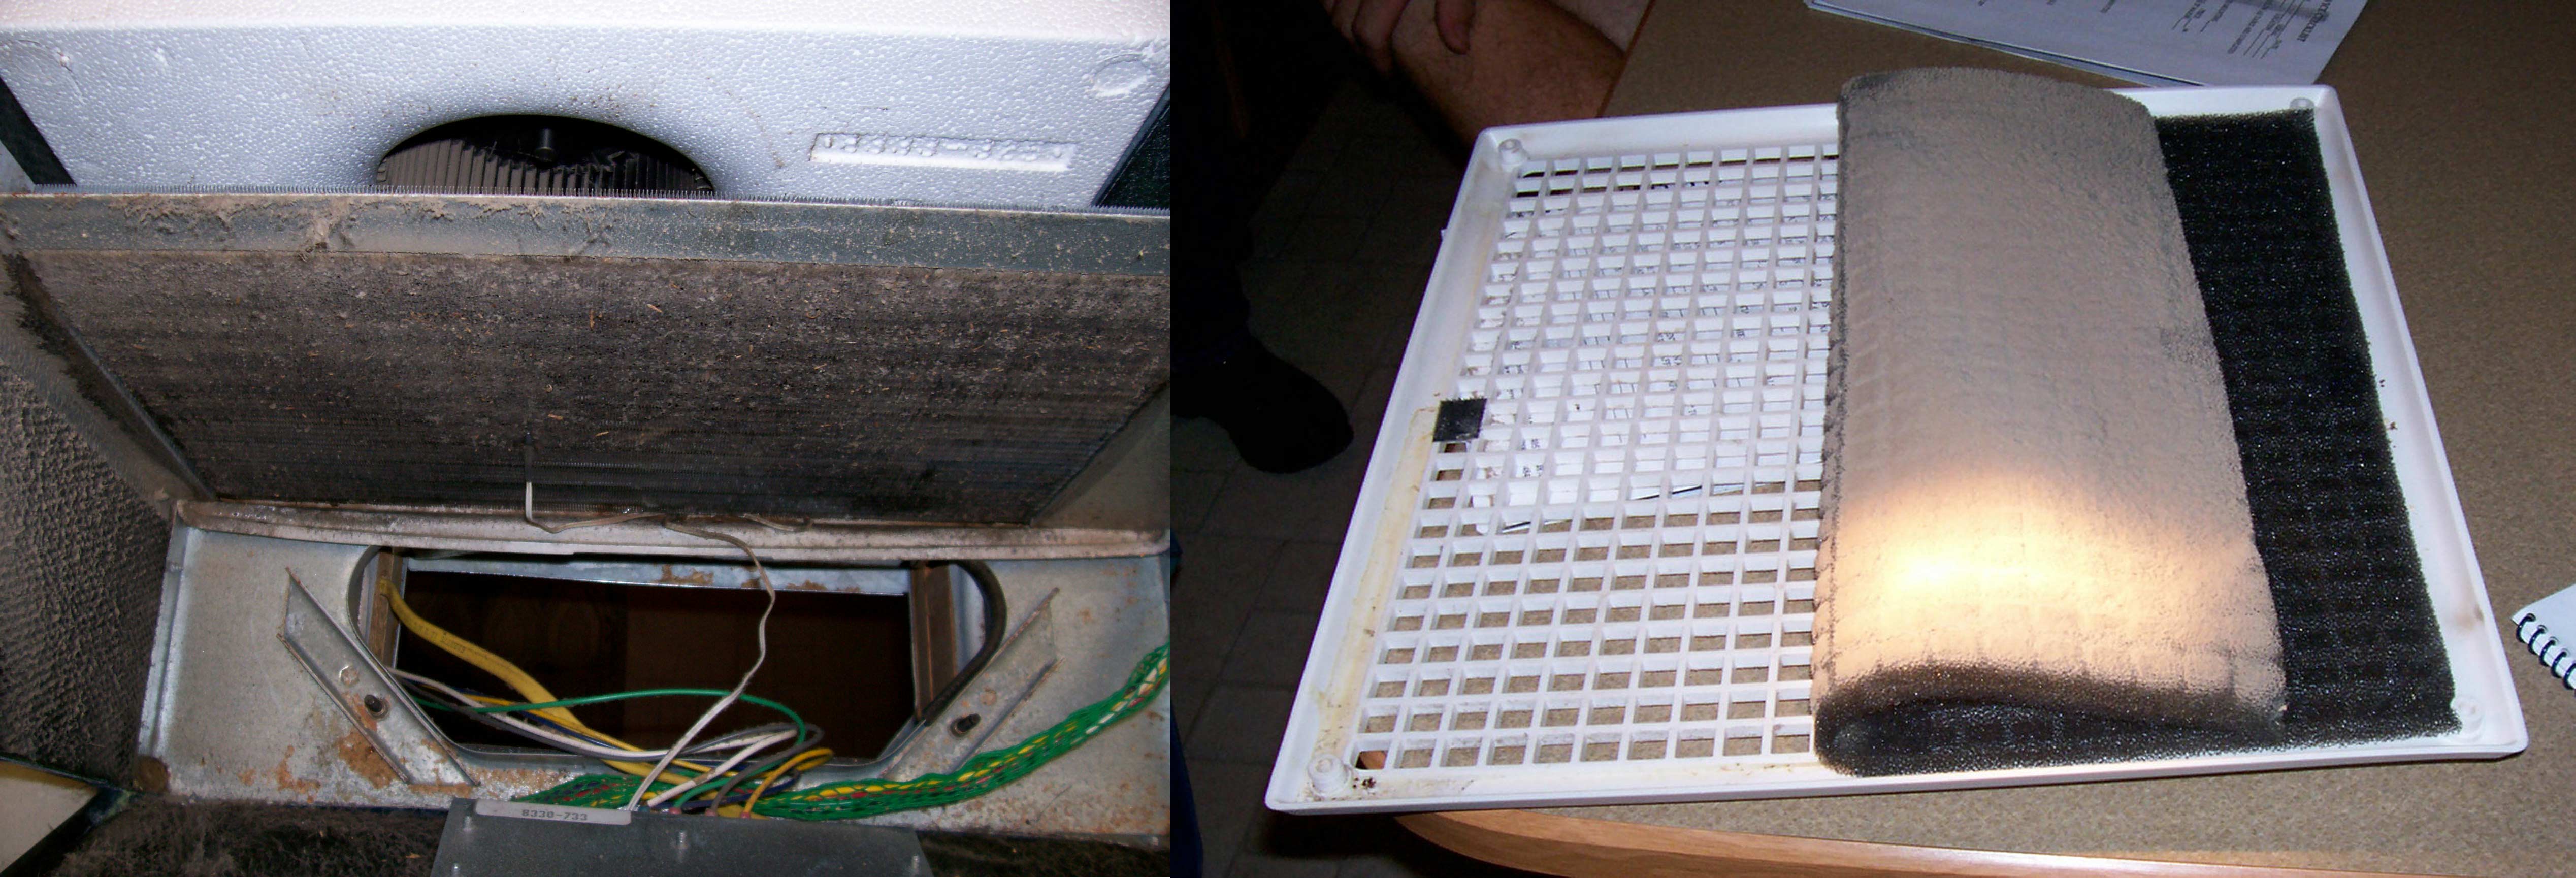
A dirty filter caused this evaporator (cold exchanger) to gum up. A dirty filter will greatly reduce efficiency.
1. The most prevalent problem with RV units is the filters not being cleaned. It is imperative that filters are clean. Unclean filters reduce air flow which can create freeze up problems, electrical problems, and efficiency problems to name a few. One of the major undesirable results of a dirty filter will be a dirty evaporator. An over simplified definition of the evaporator is the set of fins the air moves over to change air from hot to cold. With a roof mount unit you will normally only see the evaporator from inside the coach looking up into the unit when the inside ceiling assembly and /or filters are removed. When the filters become excessively dirty the excessive contaminants are pulled through the filters and will begin building up on the evaporator fins. This build up begins acting as insulation which reduces the efficiency of the evaporator. This can also create situations where the compressor can become overheated due to the use of more electrical power than normal.
2. Unlike home split system air conditioners, RV units are not designed from
the factory to be recharged. As a result you cannot check an RV unit using
pressure gauges without installing valves. I am often asked by RVers to check
the Freon® in their unit. My answer to this request is, “When is the last time
you called a refrigerator serviceman to check the charge in your home
refrigerator?”. Just like your home refrigerator a RV unit is hermetically
sealed (not like Johnny Carson’s The Great Swami’s envelopes in the mason jar).
Hermetically sealed is an accurate technical term. If you ever take your RV unit
to have it serviced ask a lot of questions and have faith in your technician
before you allow them to break into the sealed system on your RV unit. In very
rare instances some high end RV’s do have a split system.
3. To check out a RV unit there are two major and simple checks that should be
performed.
A. Temperature change.
In other words what the difference is between the temperature of the air going into the filter and the air coming out the discharge. The technical books say this difference should be a nominal 20° with the compressor running. I have seen it as high as 32° and as low as 16°. Some considerations for this temperature difference are:
• The two thermometers used to determine the temperature difference must be calibrated to each other.
• The books say the compressor should run for 30 minutes before the temperatures are taken.
• The temperature differential will be inversely proportional to the relative humidity. The condensation out of very humid air will build up on the evaporator just as the air filter contaminants mentioned earlier and act as an insulator.
B. Amperage check.
This check should be performed by a qualified technician using the correct
meters and technical information that is pertinent to the unit being checked. If
the amperage readings are out of specs you may be able to improve them with a
fairly extensive maintenance. However the damage may be irreversible and the
components of your unit will continue to deteriorate.
4. There is no way I can express the importance of proper 120VAC to the unit.
The technical books stress the importance of 103.5 volts to the unit. I
personally like to fudge a little to l05 volts as a minimum acceptable voltage. To explain the negatives of not
having proper voltage would take much longer than I have space in this article.
Please let it suffice to say proper voltage is imperative. I would highly
recommend you acquire a volt meter and use it. Be certain when you acquire the
volt meter you have it properly calibrated. Make certain whoever calibrates it
has an accurate meter. It is amazing to me the number of meters that are not
checked for accuracy on a regular basis.
As an RVer you should be certain that when you plug into a 50A service you truly
have 50A service as the coach was designed to use. This is of major importance
for any basement or dual roof model units when the units are used. I mention
this because often RV parks will wire 50A improperly or an RVer will use a 30A
to 50A adapter. Either of these can harm your units.
5. Preventative maintenance
A. Keep that filter(s) clean.
B. Access and clean the evaporator regularly. By removing the outside shroud and disassembling the evaporator plenum the evaporator is easily accessible. There is coil cleaner available to make this job easier. Be sure to read the instructions and adhere to all the safety warnings. Check the condensation tubes for blockage and clear if necessary.
C. Clean and straighten the condenser fins. The condenser fins are the fins the hot air comes through to escape into the atmosphere. On roof mounts they are on the rear of the unit. On basement models they come out the side. You might want to consider a fin guard to protect the roof mount condenser from the Oklahoma hail.
D. Inspect the upper plastic shroud for cracks and exposure deterioration. I have had many pass thru customers come to my shop after losing their top shroud while traveling down the highway.
E. Inspect your 120VAC plug on the end of your shore cord for discoloration, pitting and swelling. If you have this you should replace the plug as these conditions can be indicative of a potential loss of voltage when you plug your shore cord into an 120VAC power source.
F. Occasionally it will become necessary to remove a roof mount unit. When
this is done it is generally our shop policy to replace the gasket. We feel it
is more cost effective to replace the gasket than it is to repair water damage
in the future. These gaskets come out of the box approximately one inch thick. A
properly installed gasket is torqued to half of the original thickness. This is
also true when you feel the mounting bolts have vibrated loose. Any thinner and
the gasket should be replaced. One caution here is anytime a unit is turned on
its side to replace the gasket it should set in the proper direction for at
least four hours before it is started.
6. Air Flow
Just like your heater, good air flow across the evaporator is imperative for the most efficient operation and life expectancy of your unit. When using your unit keep all the vents open as quite often there are barely enough vents to meet manufacture specifications. When some of these ducts are closed off the unit efficiency decreases. This can also shorten the life expectancy of the compressor. Once again the details are too lengthy for me to elaborate. This can also cause a condition where the evaporator freezes over with ice. If this happens open all your vents and turn your fan to the high speed position.
7. Capacity
Some units simply do not have enough BTU output to cool the area they are
intended to cool. Factors that cause this can be the size of the unit, how many
times the door is opened and closed, the ambient conditions such as temperature,
sunshine, ground cover, humidity, size and number of windows, etc. To correct
you will have to change some of the controlling factors.
Direct Discharge A/C
This is the roof mounted model that has been around for years. The cold air
comes out right at the unit. Everything about this model has been touched on
except for the possibility of the original installer installing the cold air
sleeve improperly. The biggest problem is generally air leaks where the cold air
mixes with the incoming warm air. There are many different ways this can happen
as there are many different models. The important thing here if this is
happening is to patch the holes where the cold air is escaping. Aluminum foil
tape available at most HVAC supply houses normally works well for this repair.
Roof Mount Ducted A/C
These units have a printed circuit board built into the control box in the ceiling plenum. They must have 12VDC to operate. While there are a few older models that have a transformer and make their own control voltage these are so rare I am not going to address them. All of these models will have a thermostat on a wall somewhere inside the coach. The thermostat is the control point for the unit. Some larger coaches have two ducted units with a separate thermostat dedicated to each unit or a single thermostat that controls both units. Each unit is controlled with a different zone setting. Because there are many different thermostats and control systems for dual units I am not going to address each type of thermostat or control system individually. I would recommend you read your instructions on your thermostat thoroughly as I have made the day for many RVers by enlightening them to the proper operation of their thermostats. Often the features I pointed out were a welcome surprise.
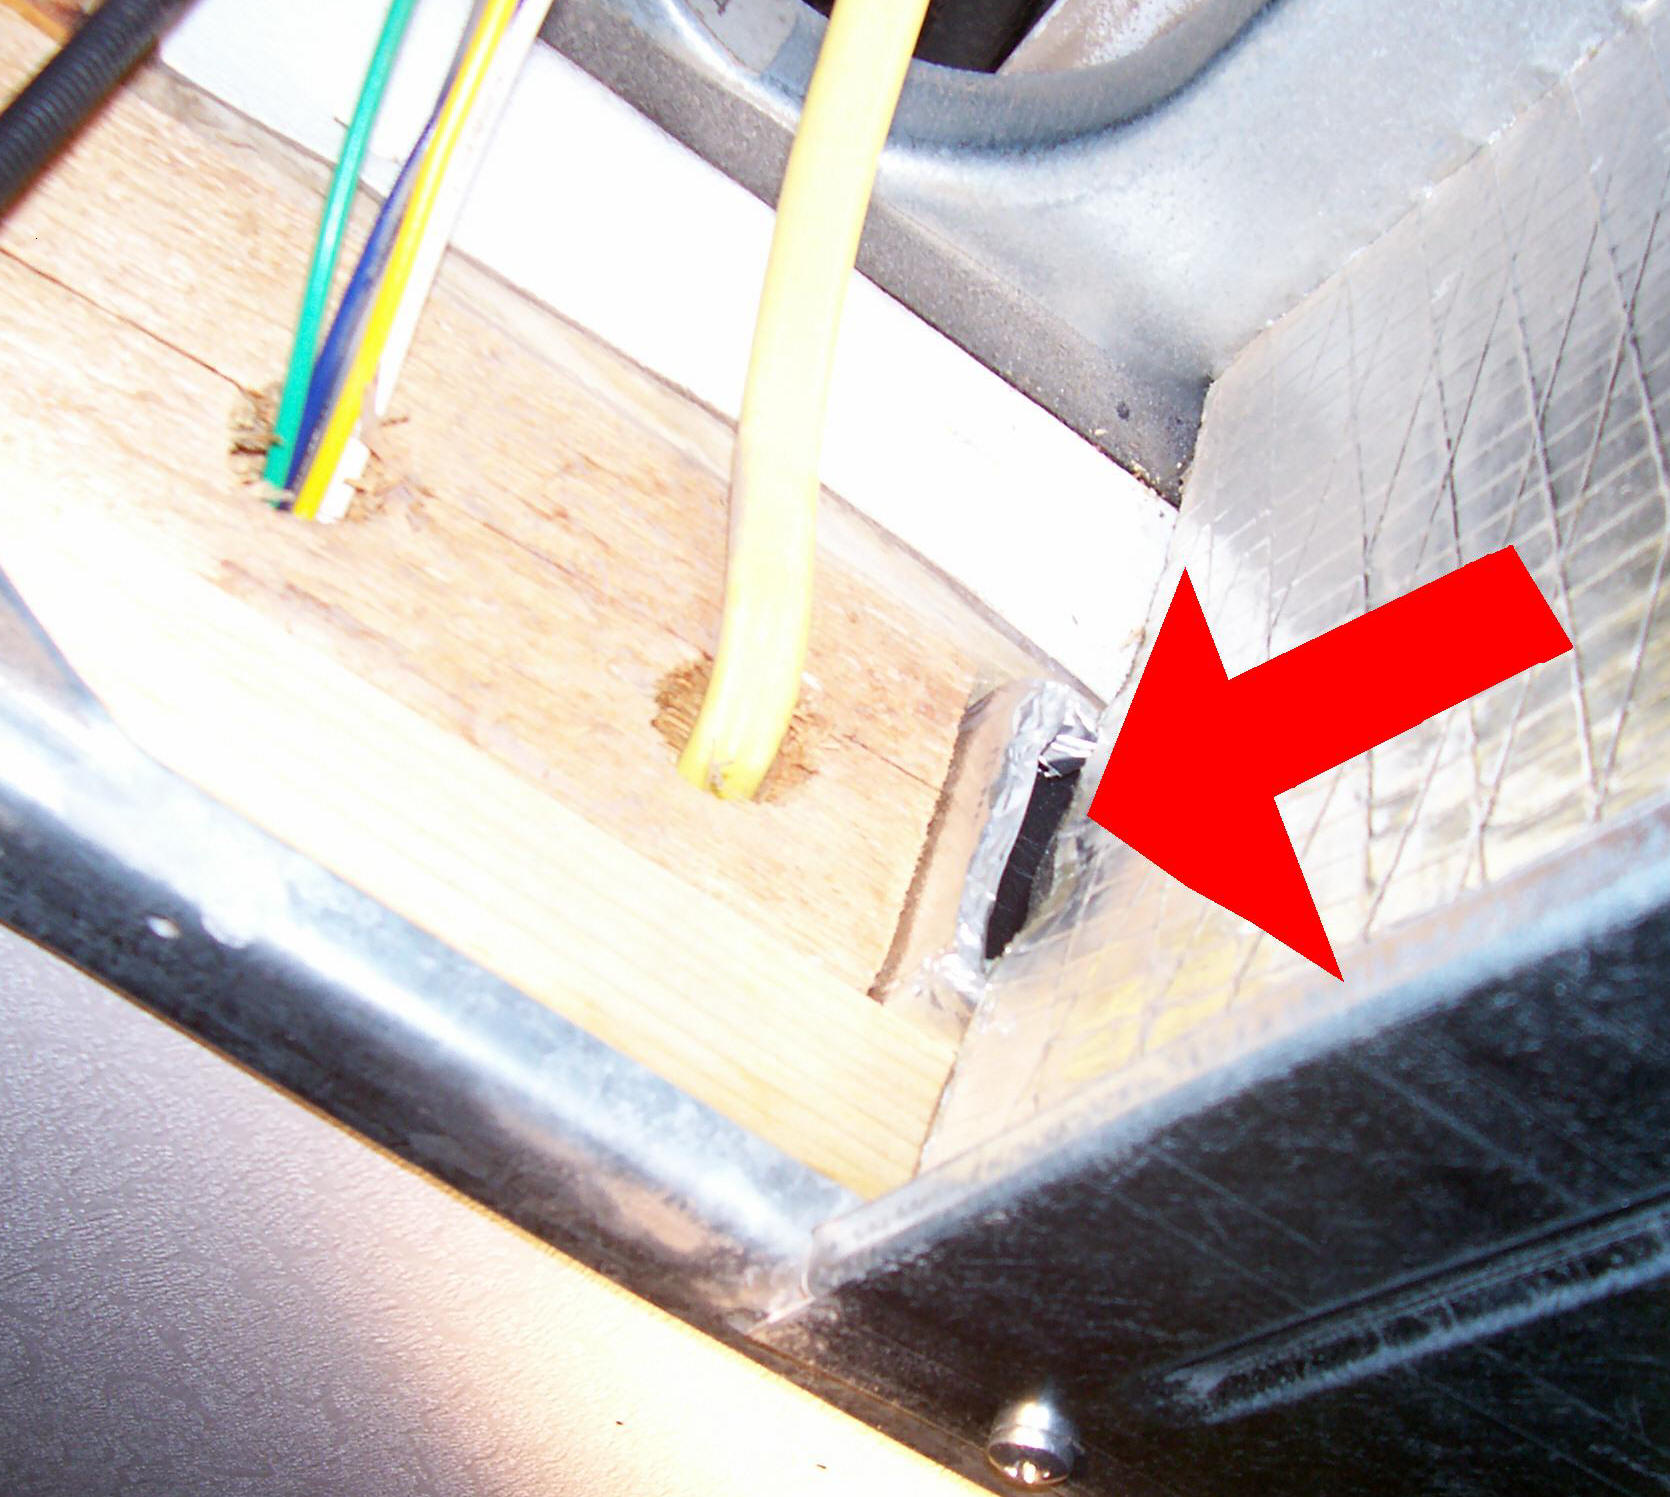
These wire holes should be sealed. The cold air is mixing with the hot air at the slot by the red arrow.
The major problem that I see with ducted units is once again the cold air mixing with the hot air. The only way to fix this is to remove the inside plenum and do a detailed inspection and alleviate any possibilities for this to happen. This is a job that probably can best be done by a qualified technician with experience of where to look for these air leaks. Another problem is blown fuses at the converter or improper 12VDC to the printed circuit board. Without proper 12VDC the printed circuit board cannot send 120VAC to the unit.
Hint: If your unit does not work when you reset the controls at the
thermostat and you hear a faint click from the ceiling plenum you probably have
proper 12VDC. Your problem is probably with your 120VAC. Check your circuit
breakers and 120VAC power source.
Basement Model A/C
These units are generally found in larger coaches with 50A-120VAC service.
There is little an RVer can do to these except keep the filters clean and do not
block the discharge air.
The filters are often regular home style filters. You can acquire these at your
local hardware store. 14 x 20 is a common size, however you should check your
size before purchasing replacement filters. Consult your manual for detailed
information. I have seen pet beds partially covering the air intake for this
type of unit. For peak efficiency this should be avoided. On RV's with floor vents, check that rugs are not covering these vents.
Often these units must be removed from the coach to be serviced. This will
generally require a qualified technician with the proper equipment and
experience.
These units have a detailed sequence of operation controlled by a pc board.
Working on theses units will generally require a qualified technician to have
access to detailed troubleshooting information.
Hopefully this information will be of value to you. I have tried to keep everything in layman terms so as not to make it complicated for the average RVer. This article is not intended to be an all inclusive technical article nor is it intended to encourage persons who are not properly trained in the subject matter to attempt repairs or maintenance.
No person should ever attempt repairs or maintenance on an RV air conditioner without proper training/licensing, tools, and/or access to correct technical information.
Thank you for reading this article.
Gary Motley
Back to Motley RV Repair Home Page Back to Motley RV Repair RV Care/ Use Articles